Questions#
In Numbas, a question is a self-contained assessment of a particular scenario. Every Numbas question consists of three sections: Statement, Parts, and Advice.
In the Statement, the context for the question is given to the student.
Parts are where the student enters their answers. A question can have one or more parts, each of which is one of several types, depending on what kind of input you want from the student.
Finally, the optional Advice section can be used to give a full solution to the question, which the student can request to see if they’re stuck, or once they’ve finished the exam.
The content in each section is generated each time the question is run, based on the question’s variables.
Creating a question#
To create a question from any page in the Numbas editor, click on the plus icon at the top of the page, and select Question.
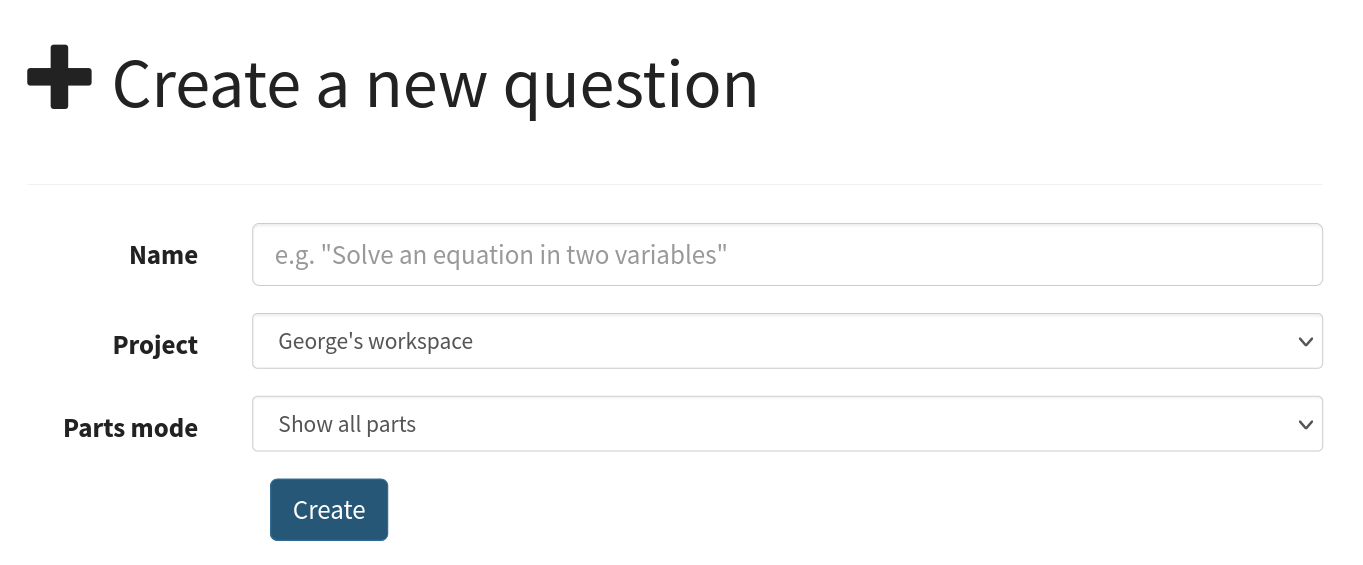
You must give a name for your question, and select a project for it to go in. The default project is your personal workspace; you can always move the question to another of your projects later on.
The question editor#
At the top of the question editor is the question’s name, as well as a stamp showing the status of the question.
Click on the status stamp to give feedback about the quality of an question, after test running it. The options are listed in descending order of “suitability for use”:
- Ready to use
This question is of sufficient quality to give to students.
- Should not be used
This question works, but you deprecate its use - for example, if it’s not intended for use by students, or there’s a better version elsewhere.
- Has some problems
This question works, but has some problems which mean it’s not ready for use by students - for example, the question is incomplete, or changes need to be made to the text. Further work is needed before this question can be given to students.
- Doesn’t work
This question doesn’t even run!
- Needs to be tested
This question looks alright to me, but it should be checked thoroughly before being used.
On the left of the screen are Admin controls and labels for each of the editing tabs.
Admin controls#
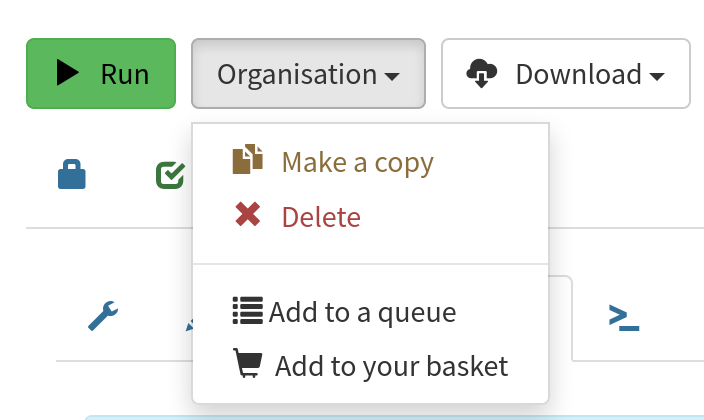
- Run#
Opens a preview of the question in a new window. A specially simplified theme will be used, different from the one used for exams.
Warning
Do NOT use this link to deliver the question to students. This link is not permanent and could stop working at any time. Instead, either download the exam and put it on your own webspace or in a VLE, or use the Share button on the preview to obtain a permanent link.
- Make a copy#
Create a copy of the question. Use this to make changes to an question which does not belong to you.
- Delete#
Delete the question permanently from the database.
- Download#
Links to download standalone packages of the question.
standalone .zip - a compiled package of the question, ready to run anywhere without connecting to a VLE.
SCORM package - a compiled package of the question with SCORM files included, so it can be uploaded to a VLE and communicate with its gradebook.
source - a plain-text representation of the question, to be used with the Numbas command-line tools.
- Add to your basket#
Add this question to your basket, so you can include it in an exam.
Content areas#
Each portion of text displayed to the student (for example, the statement, advice, and part prompts) is a content area. A content area can include text, images, or more dynamic content such as videos and interactive diagrams.
By default, text is edited using the rich text editor. Click on the Source code button to edit the raw HTML code for the content area.
Click on the Preview button to see how the content will look with question variables substituted in.
The rich text editor#
You can write mathematical notation in content areas using LaTeX; see the section on LaTeX notation.
There is a button in the rich text editor labelled Conditional visibility. This allows you to give an expression (in JME syntax) which dictates whether or not the selected text is shown. You can use this to show one of several blocks of text based on a random variable.
Substituting variables into content areas#
There are two modes of variable subsitution: substitution into plain text (or HTML), and substitution into mathematical expressions.
Here’s a quick summary of the different methods of substituting variables into question text, to help you choose:
I want to substitute |
Such as |
So use |
|---|---|---|
A text string |
Someone’s name |
Curly braces, e.g. |
A single number into a LaTeX expression with no surrounding operators |
\(x\) in \(a = x\) |
\var,
e.g. |
Several numbers into a LaTeX expression |
\(a\), \(b\) and \(c\) into \(ax^2+bx+c\) |
\simplify,
e.g. |
Substitution of variables into plain text is straightforward: just enclose the variable name (or any JME expression) in curly braces. For example:
Bob the farmer has {num_animals} {animal_name}.
produces:
Bob the farmer has 12 sheep.
when num_animals = 12 and animal_name = "sheep".
The substitution of variables into a mathematical expression is more complicated: depending on context, the surrounding expression may need to be change for different values of the substituted variables. Numbas provides a simple system to handle substitution of variables into mathematical expressions; see the section on Substituting variables into displayed maths.
Statement#
The statement is a content area which appears at the top of the question, before any input boxes. Use the statement to set up the question and provide any information the student needs to answer it.
Note
Only use the statement area to give information, don’t ask a question. Do that in the prompt area of each part.
Parts#
Motivation
A part is an opportunity for the student to give an answer in response to a prompt. A question might contain more than one part if the student needs to perform a sequence of steps, and you want to assess each of them independently.
Each question has one or more parts.
In the editor, parts are displayed in a list on the right of a page; you can click on a part in the list to start editing it. You can drag a part up or down to change its position in the question.

To add a new part to your question, click the Add a part button at the bottom of the list, then click on one of the part types shown. You can filter the list by typing keywords in the search box at the top. Built-in part types are shown first, followed by any custom part types you have access to.
See Question parts for more on part settings.
Part display mode#
There are two modes that dictate how question parts are presented to students.
You choose the part display mode when you create a question. It isn’t possible to change the part display mode of an existing question.
- Show all parts#
In Show all parts mode, all parts are shown to the student in a list. The student is given a separate score for each part, and their total score is the sum of their scores for each part.
- Explore#
In Explore mode, the student’s journey through the parts of the question is not determined in advance.
When the question begins, the student is shown the first part. Each part defines a list of “next part” options, which the student can choose to follow.
The student’s scores from each part are collected into pre-defined Objectives. The student might accumulate penalties by visiting certain parts. The student’s total score for the question is the sum of their objective scores minus the sum of their penalties.
See the page on Explore mode.
Motivation
The original Numbas design only allowed the ‘Show all parts’ mode, following the design of older systems.
The ‘explore mode’ allows a wider range of interactive experiences, at the cost of a bit more setup by the author.
Use the ‘show all parts’ mode if you just want the student to answer a fixed set of question prompts.
Variables#
Motivation
The ability to randomise questions is one of the main benefits of computer-based assessment. When a question is randomised, all of the sections of the question are affected: statement and prompts, marking, and the advice. Variables represent randomly-generated values, as well as values derived from other variables. Variables can be referred to by name throughout the question’s content areas and marking settings, so they’re substituted in automatically when a student runs the question. Defining variables in terms of other variables makes it easy to organise and reuse sophisticated computations.
The Generated value column shows a generated value for each variable. Note that when the question is delivered to students, the variable values are generated with each new attempt, so students won’t necessarily see the same values as those displayed here. It’s a good idea to use the Regenerate values button a few times to check that randomised variables don’t take unsuitable values.
You can reorder the variables in the list by dragging them. Doing this doesn’t affect the way values are computed.
This screencast gives a quick summary of how the variable editing interface works:
This screencast describes which variable names are valid, and gives some advice on how you should pick names:
Definition#
- Name#
The name of the variable. See the section on variable names.
You can assign more than one variable at once by writing several names separated by commas. The value must evaluate to a
list, or a type which can be converted to alist. For example,x,yin the name field and[1,2]would assign a variablexwith the value1andywith the value2.- Data type#
Specify what type of data the variable should hold. The JME code option allows you to define the variable using JME syntax, while the other options provide simplified forms.
The JSON data option allows you to enter raw JSON data, which is parsed into JME data.
The Short text string and Long text string options have a checkbox labelled Is this a template?. If ticked, the string will be marked as
safe, and variable values will not be substituted into it. Use this in conjunction with therenderfunction to write reusable pieces of text.- Value#
Define the variable’s value. The format of this field depends on the data type.
- Description#
Describe what the variable means, and how it is used. It’s also often helpful to explain how it’s defined, and what changes can be made to it.
Note
Don’t underestimate the value of the description field! Variables whose meaning seems clear when you write them have a habit of becoming indecipherable months later.
- Can an exam override the value of this variable?#
If this is ticked, then when an exam uses this question the author can override the value of this variable with their own choice.
- Generated value#
This box shows a representative value of this variable. This is the same value as shown in the Variables list. Click Regenerate variables to generate another value.
When you run the question or include it in an exam, a fresh value is generated for each attempt at the question.
- Depends on#
A list of all variables used in this variable’s definition. You can click on a variable name to go to its definition. If the variable hasn’t been defined yet, it’ll be created.
- Used by#
A list of all variables which use this variable in their definition, and other places in the question which use this variable. You can click on a variable name to go to its definition, or click on a reference to go the relevant section of the editor.
Locking variable values#
Motivation
Sometimes you want to focus on a particular case in a randomised question. Rather than constantly regenerating all the question’s variables to get back to the case you want, or temporarily redefining the involved variables to fixed values, you can lock a variable to keep its current value until you’re ready to re-randomise it.
The preview values for each question variable are regenerated each time you click on the Regenerate variables button or, if the Automatically regenerate variables when changes are made option is ticked, whenever a variable definition is changed.
You can lock the value of a variable so that it doesn’t change when the other variables are regenerated. To do so, click on the padlock icon next to the variable’s name. Any variables used in the definition of the locked variable (those which appear in the Depends on list) will also be locked implicitly, so that you don’t end up with an inconsistent set of variables. You can unlock a variable by clicking on the padlock icon again.
Warning
Variables are only locked inside the editor’s preview area - when you run the question, or include it in an exam, a fresh value for the variable will be generated.
Variable testing#
Motivation
Sometimes it’s hard to define randomised question variables so they’re guaranteed to produce a usable set of values. In these cases, it’s easier to state the condition you want the variables to satisfy, and let Numbas automatically throw out sets of values that don’t work.
This tab provides tools to test your variables for desired properties, so you can automatically re-randomise your questions’ variables until you get a suitable set of values.
Example question using variable testing tools.
Warning
While this tool allows you to pick sets of variables that would be hard to generate constructively, it’s a random process so you must be aware that there’s a chance no suitable set of values will ever be found. Use the Test condition button to see how likely this is.
Note
If you’re using seedrandom to generate variables deterministically, you need to ensure that you use a different seed on each attempt to generate variables.
The variable variable_generation_run_number counts the number of attempts that have been made to generate variables, so you can use that as part of your seed value.
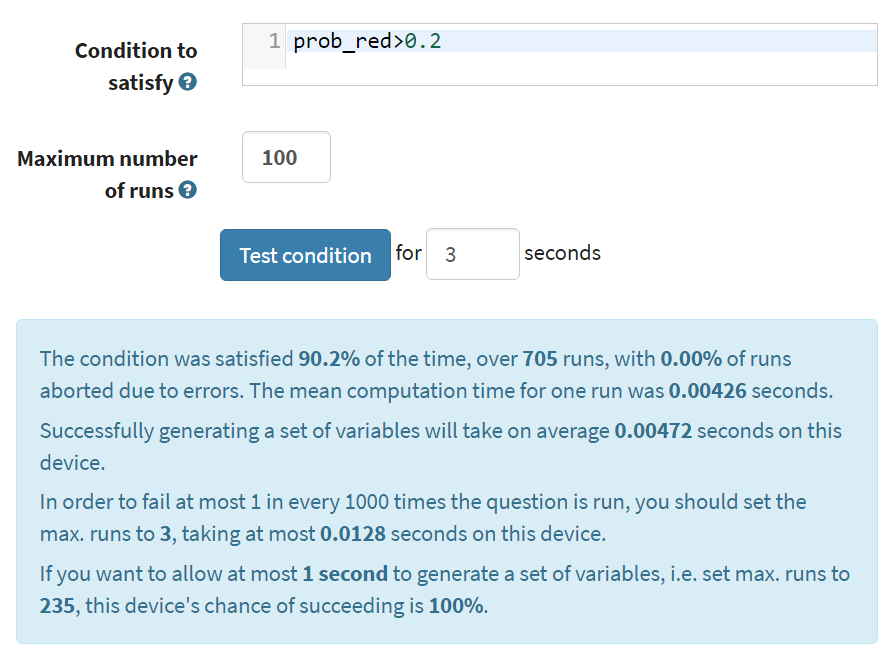
- Condition to satisfy#
A JME expression which should evaluate to true when the set of variables generated has the properties you want. For example, if a, b and c are the coefficients of a quadratic equation and you want it to have real roots, the condition could be b^2-4*a*c>=0.
When the student runs this question, the system will regenerate the set of variables until it finds one which satisfies this condition.
- Test condition#
When you press this button, the editor will generate as many sets of variables as possible within the time given. When it finishes, you’ll be presented with statistics including the proportion of runs which produced acceptable sets of values, and the expected number of runs before an acceptable set of values is found.
If the calculate probability of getting an acceptable set of variables within 1 second is lower than 99%, you should make changes to your variable definitions.
- Maximum number of runs#
The maximum number of times the system should regenerate the set of variables without finding a set which satisfies the condition before giving up. If the system exceeds this number in a compiled exam, the entire exam will fail, so try to avoid it!
Exam variables#
There are a couple of variables defined at the exam level, whose values are available to every question in the exam.
You can use these to coordinate values between separate questions, perhaps using the seedrandom function.
Advice#
Motivation
Students find it enormously valuable to see a full solution to a question they’ve attempted, to compare against their own working. During formative use, students might reveal the advice to remind themselves of the techniques required, then regenerate the question and try again.
Advice is a content area which is shown when the student presses the Reveal button to reveal the question’s answers, or at the end of the exam.
The advice area is normally used to present a worked solution to the question.
Extensions & scripts#
This tab contains tools to change the behaviour of your question, using pre-built extensions, redefining constants, or by adding custom JME functions and JavaScript.
Extensions#
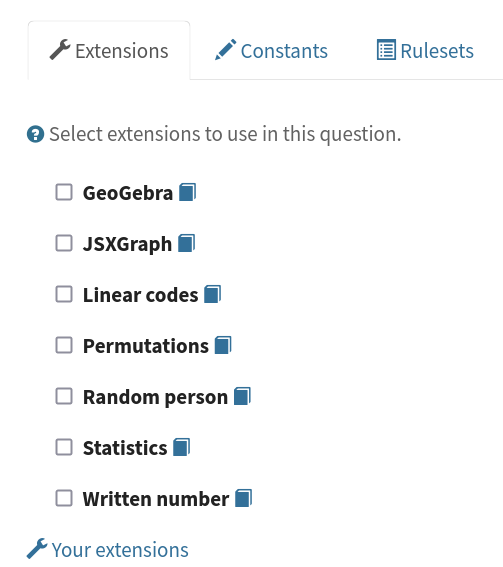
Motivation
Extensions can provide new functionality, such as extra JME functions or content types.
Some extensions include large external libraries or modify the behaviour of Numbas in a way that not everyone wants, so they’re not included in Numbas by default, and made available as optional extras instead.
To use an extension in your question, tick its checkbox here. All functionality provided by the extension will become available immediately. See the section on extensions.
Constants#
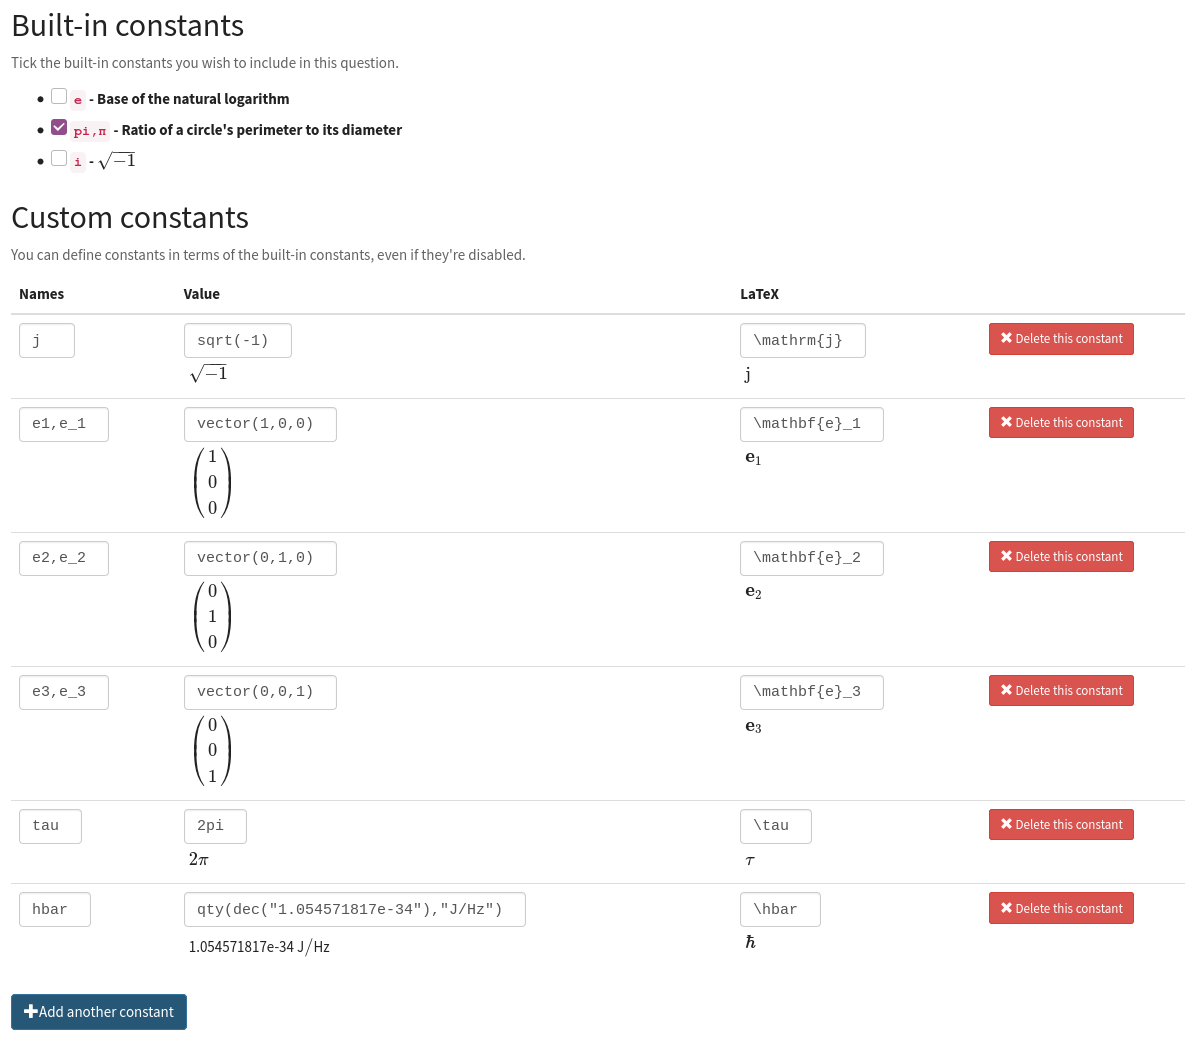
Motivation
The meaning of some symbols differs depending on the context you’re working. Numbas has some built-in constants, such as \(\pi\) and \(i\) for the circle constant and the imaginary unit, respectively. You can disable the built-in constants, override them with different values, or define new constant symbols.
Common alternate notations for constants include \(j\) for the imaginary unit and \(\tau = 2\pi\) for the circle constant.
Constants in JME expressions are replaced with their values when evaluating, and rendered using their particular symbols in LaTeX.
Constants defined in this tab are available throughout the whole question, including variable definitions and student answers to mathematical expression parts.
There are some built-in constants. Untick any that you don’t want to use - the corresponding symbols will be treated as free variables unless you define a new constant with the same symbol.
Under Custom constants, click the Add a constant button to define a new constant.
The Names field should contain a comma-separated list of JME variable names that can be used to refer to the constant.
The Value field should contain a JME expression giving the value of the constant. You can refer to the built-in constants in this expression, even if you have disabled them.
The LaTeX field should contain some LaTeX code that is used to represent the constant.
When a JME expression is rendered as LaTeX, any values equal to a defined constant are rendered using that constant’s LaTeX code.
There are some ‘common constants’: the circle constant, the imaginary unit, the base of the natural logarithm, and infinity.
Any constant equal to \(k\pi\) or \(\frac{1}{k}\pi\), where \(k \in \mathbb{N}\), will be used as the circle constant.
The imaginary unit, \(\sqrt{-1}\), is used when rendering complex numbers.
The base of the natural logarithm, \(e = 2.71828 \ldots\), is used when rendering exponentials.
Rulesets#
Motivation
If you find yourself using the same set of rules repeatedly in \simplify commands, define a new ruleset with a shorter name to save yourself some typing.
A “ruleset” defines a list of named simplification rules used to manipulate mathematical expressions.
Functions#
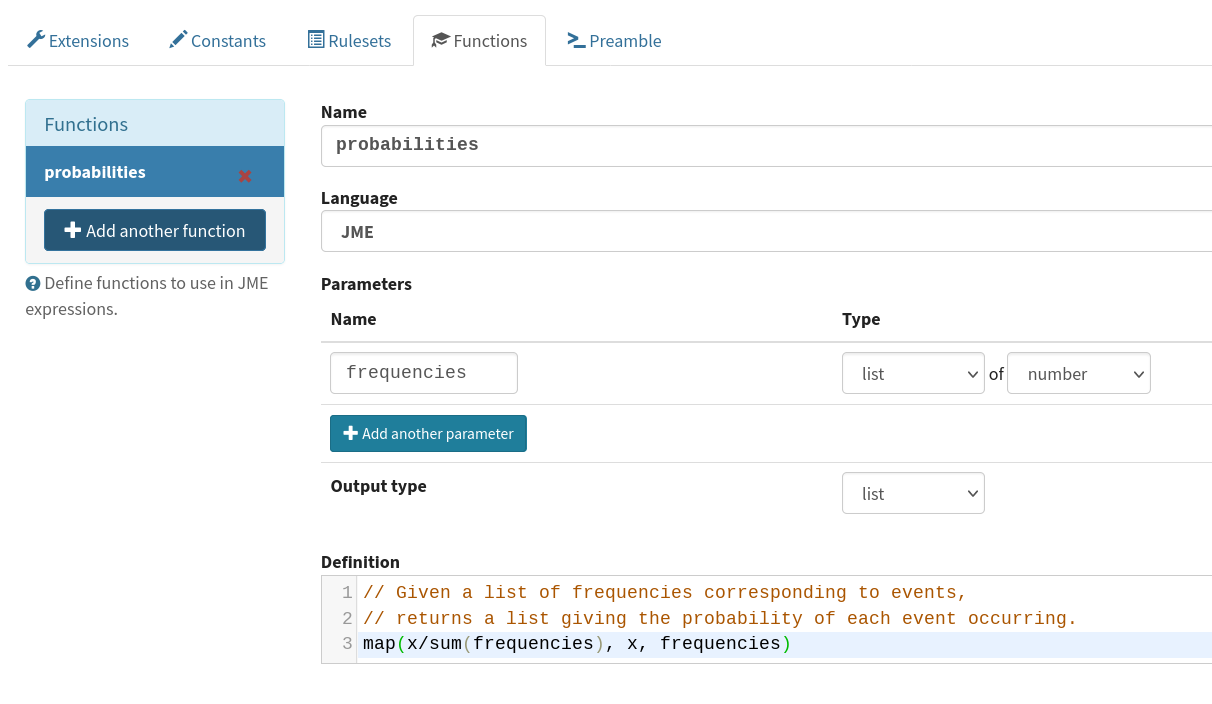
Motivation
If you need to do something a bit more complicated with variables, or you find yourself repeating the same pattern over and over, you can define a custom function.
Complicated algorithms, or dynamically-generated sections of display content, are often easier to implement in JavaScript than JME. Custom functions allow you to wrap up JavaScript code as a JME function.
Custom functions can be used in any JME expression in the question, such as variable definitions or part answers.
- Name#
The name of the function. Should be a valid JME name - it should start with a letter, and contain only letters and numbers, with no spaces or punctuation.
- Language#
Functions can be defined either with a JME expression or with JavaScript code. In the case of a JME expression, the value returned is the result of evaluating the expression on the function’s parameters. You can also refer to the question’s variables.
JavaScript functions should return their result with a
returnexpression. You don’t need to write thefunction(parameters) {}part - just write the function body.- Parameters#
The parameters given to the function. You can refer to them by name in the function’s definition. Make sure you correctly set the types of the parameters. You can define several functions with the same name but different parameter types, if it makes sense to do so.
You can specify the type of contents of
listanddictparameters using the selection box following the text of.For more complicated parameters, such as nested structures or optional arguments, select custom and write a custom signature expression.
- Output type#
The type of the value returned by the function.
Custom signature expressions#
The parameter type drop-down allows you to specify a single type that a parameter must match. You can define more complicated types using custom signature expressions. These are most useful for functions written in JavaScript; in JME you can rely on the system to convert data types as necessary.
Using these expressions, you can specify the type of nested data structures, allow optional arguments or any number of arguments.
Note that this is not JME syntax.
Expressions can be built from the following components:
Syntax |
Such as |
Meaning |
|---|---|---|
|
|
A value of the given type, or a type that can be converted to that type. |
|
|
A single value of any type. |
|
|
Multiple parameters matching |
|
|
An optional parameter matching
|
|
|
A list whose elements each match
|
|
|
A dictionary whose values match
|
|
|
Either match |
Examples:
JME functions#
Functions defined using JME work similarly to variables - the function’s parameters are substituted into the expression, which is then evaluated.
Comments can be added to function definitions in the same way as variable definitions - anything on a line after two forward slashes is interpreted as a comment and not evaluated. For example:
map(
    log(n),    //take log of n
    n,         //for n in
    1..10      //the range 1 to 10 (inclusive)
)
JME does not allow for much control over program flow. Most importantly, there are no loops. Some functions can naturally be defined recursively, but note that recursive function calls can be very slow, since recursion isn’t optimised.
Here’s an example of a function which computes the \(n\)th Fibonacci number recursively:
//nth fibonacci number
//f(0) = f(1) = 1
//f(n+2) = f(n)+f(n+1)
if(n<=1,
    1,
//else
    f(n-2)+f(n-1)
)
JavaScript functions#
Writing a function in JavaScript allows you to use all of that language’s features, such as loops, anonymous functions and DOM manipulation.
Functions defined in Javasript don’t need the function(parameters) { ... } enclosure - that’s provided by Numbas - but they do need to return a value.
Note
JavaScript functions are passed the containing JME scope object as an additional parameter. You can use this to evaluate JME expressions or to obtain the values of variables not explicitly passed to the function. Keep this in mind if you write a function which takes a variable number of parameters.
Note
There are several data types for representing numbers.
If you want them to be converted to standard JavaScript numbers when they are passed to your function, make sure that you specify the number type for the corresponding parameter(s).
Values inside lists also need to be converted; if you have nested data structures such as two-dimensional lists, you will need to use a custom signature expression.
Numbas provides a large library of functions which you can use.
These are accessed from the global object Numbas.
The best way to see what’s available is to look at the Numbas code documentation.
While the JME system has its own type system for variables, separate from JavaScript’s, function parameters are unwrapped to native JavaScript values on evaluation so you normally don’t need to worry about it.
Note
You will need to take care when dealing with number-like data types, particularly for lists of numbers. Use the list of option for a parameter’s type to specify that numbers in a list should be converted to native JavaScript numbers.
Preamble#
Motivation
For those who can write JavaScript, the preamble allows you to add some code which affects the entire question.
Many of the use cases for the JavaScript preamble are now more appropriately implemented with features such as custom part types and marking algorithms. The preamble is still there for backwards compatibility, and for new experimental features.
The CSS preamble allows you to style certain portions of your question, without relying on a custom exam theme.
The code written in the JavaScript preamble is executed when the question is generated, just before the question’s variables are calculated.
The JavaScript preamble can access the question’s properties through the question variable.
You can see an example of the JavaScript preamble in use at https://numbas.mathcentre.ac.uk/question/2705/jsxgraph-test-preamble-version/.
You can see what functions are available in JavaScript at the Numbas code documentation.
If you want to do something with the display of the question on the page, you have to wait until its HTML has been generated, using the HTMLAttached signal.
Here’s an example which hides an element in the statement with a given id:
question.signals.on('HTMLAttached',function() {
    question.display.html.querySelector('.statement #secret').style.visibility = 'hidden';
});
The preamble also runs before the question’s variables are generated; if you’d like to do something that uses the question’s variables, you can either wait for HTMLAttached, or use variablesGenerated if you need to do something before the HTML is generated.
You can get question variables as JME data types using question.scope.getVariable(name), or as simple JavaScript data in the object question.unwrappedVariables.
Here’s an example use:
question.signals.on('variablesGenerated',function() {
    alert("a = "+question.unwrappedVariables.a);
});
Warning
Since JME variable names are case-insensitive, all names are converted to lower case when used in JavaScript.
For example, a JME variable firstItem would be available in JavaScript as question.unwrappedVariables.firstitem.
The CSS preamble can be used to change the look of elements in your question. You can see an example of the CSS preamble in use at https://numbas.mathcentre.ac.uk/question/2704/css-preamble/.
Resources#
You can upload any file as a resource to make it available for use elsewhere in the question.
Uploaded files are available from the relative URL resources/question-resources/.
The URL for each resource you’ve uploaded is displayed next to its thumbnail.
The most common use case is to include images in content areas; see the tutorial on including an image in a question.
Settings#
- Name#
This is shown to the student and used for searching within the editor, so make it something intelligible. “Find the roots of a quadratic equation” is a good name; “Alg102 q2” is not.
- Licence#
You can specify the licence under which you are making your resources available. Different licences allow other users to copy, modify or reuse your content in differnet ways - consider which licence to choose carefully. CC BY allows other users to reuse your content however you like, as long as they give appropriate credit to you.
- Description#
Use this field to describe the question’s contents, what it assesses, and so on. This is shown in the questions index and in the questions list of any exams containing this question, so make sure it’s fairly concise.
- Tags#
Use tags to categorise questions so they can be found through the search function. Your guiding principle should be “more is better” - try to write down all words that someone searching for this question might use.
After typing a tag in the box, press the Enter key to add it to the list.
- Ability levels#
Select the ability level that the question is designed for.
- Taxonomy#
The mathcentre taxonomy provides a framework for specifying the topics that a question relates to. Select all topics relevant to the question; the taxonomy is hierarchical, so more specific subtopics appear once you’ve selected a broader topic.
Testing#
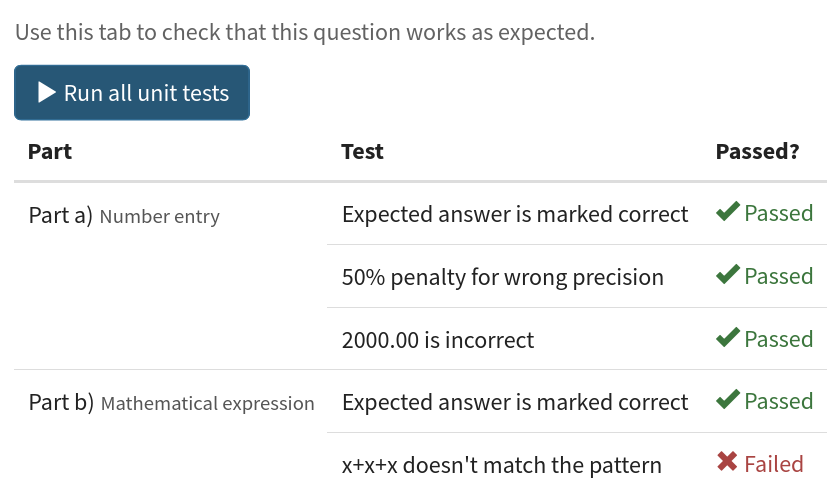
The Testing tab, with one failed test.#
The Testing tab shows the unit tests associated with each part of the question.
You can run all the tests at once by clicking the Run all unit tests button.
If there are any errors which mean the tests can’t be run, they are shown at the top of the list of tests.
Each test’s status is shown in the rightmost column.
You can click on a test’s name to go to its definition in the part editor.
Access#
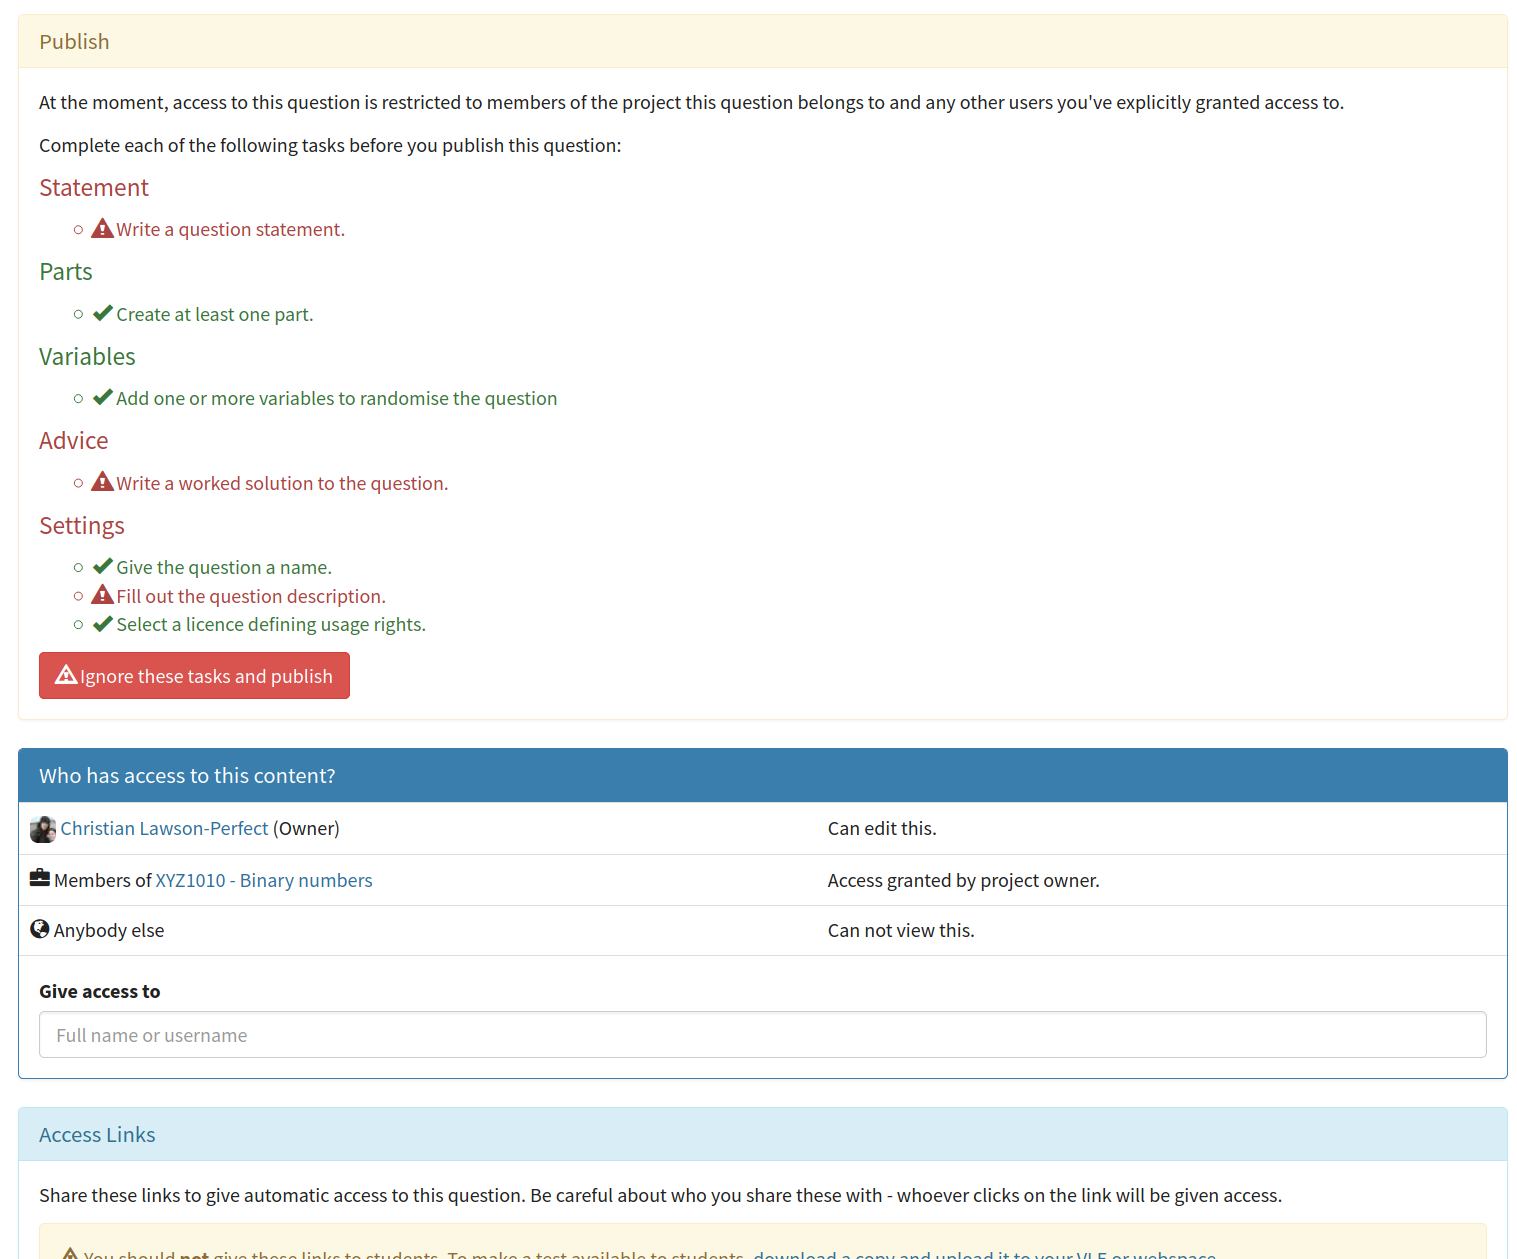
You can control who is allowed to see, and to edit, your questions.
When you create a new question, access is limited to you and any other members of the project the question belongs to. You can grant extra access to indvidual users or publish your question to the public database, where it can be viewed by any other user.
Give access to a user#
Type a name into the search box to find a user. Click on a user’s name in the results list to add them to the access list.
Named users can have the following rights:
Access Links#
The URLs in this section automatically grant access to whoever follows them. You could use these links to share a question with someone who hasn’t yet created an account on the editor, or to share a question with a group of people without inviting each person individually.
Warning
These URLs grant access to whoever clicks on them, so be careful about how they’re shared.
Exams using this question#
A list of links to each of the exams which contain this question, for convenience.
Other versions#
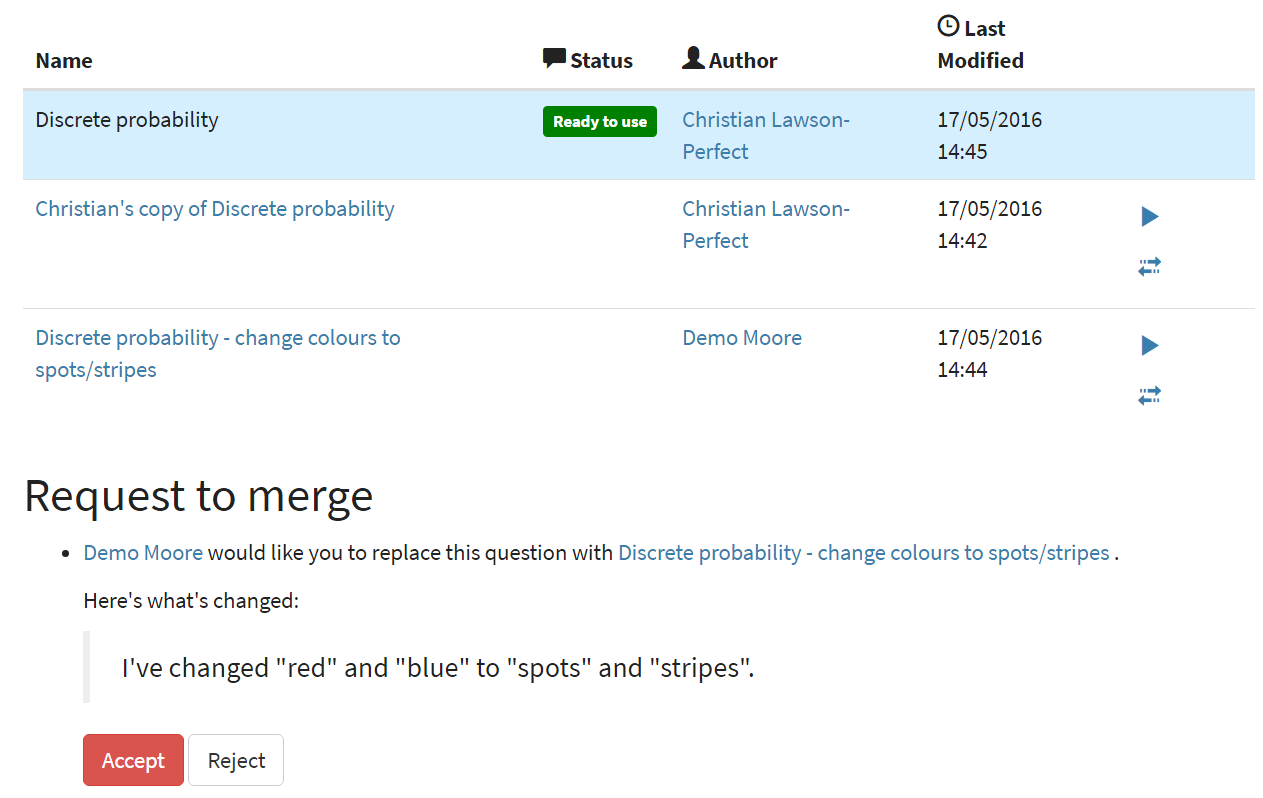
In this tab you can see all questions which are related to this one. Questions are related if one is a copy of the other, or they are both copies of a common ancestor. You can use this tab to compare the current question with related versions, and offer to merge your version of the question into another.
Click on the Compare link to go to a screen where you can offer to replace the other version with your version, or vice versa. If you have editing access to the destination question, you can replace it with the other version automatically. If you don’t have editing access, the owner of the question will be sent a Request to merge, which they must accept before the questions are merged.
Before creating the request, you’ll be asked to describe how your version differs from the one you want to replace. Try to sum up all your changes - this will show up in the question’s editing history if your request is accepted.
Warning
If the question you want to replace has changed since you made a copy of it, those changes will be lost if the request to merge is accepted - the question is completely overwritten with the new version.
You can always restore an old version of an question after a merge, by clicking on the appropriate restore link in the Editing history tab.
Active requests to merge other versions into the current question are shown underneath the list of related versions. You can accept the request, in which case your version will be replaced with the other version, or reject it, in which case your version will be unchanged and the person who made the request will be notified that it was rejected.
Editing history#
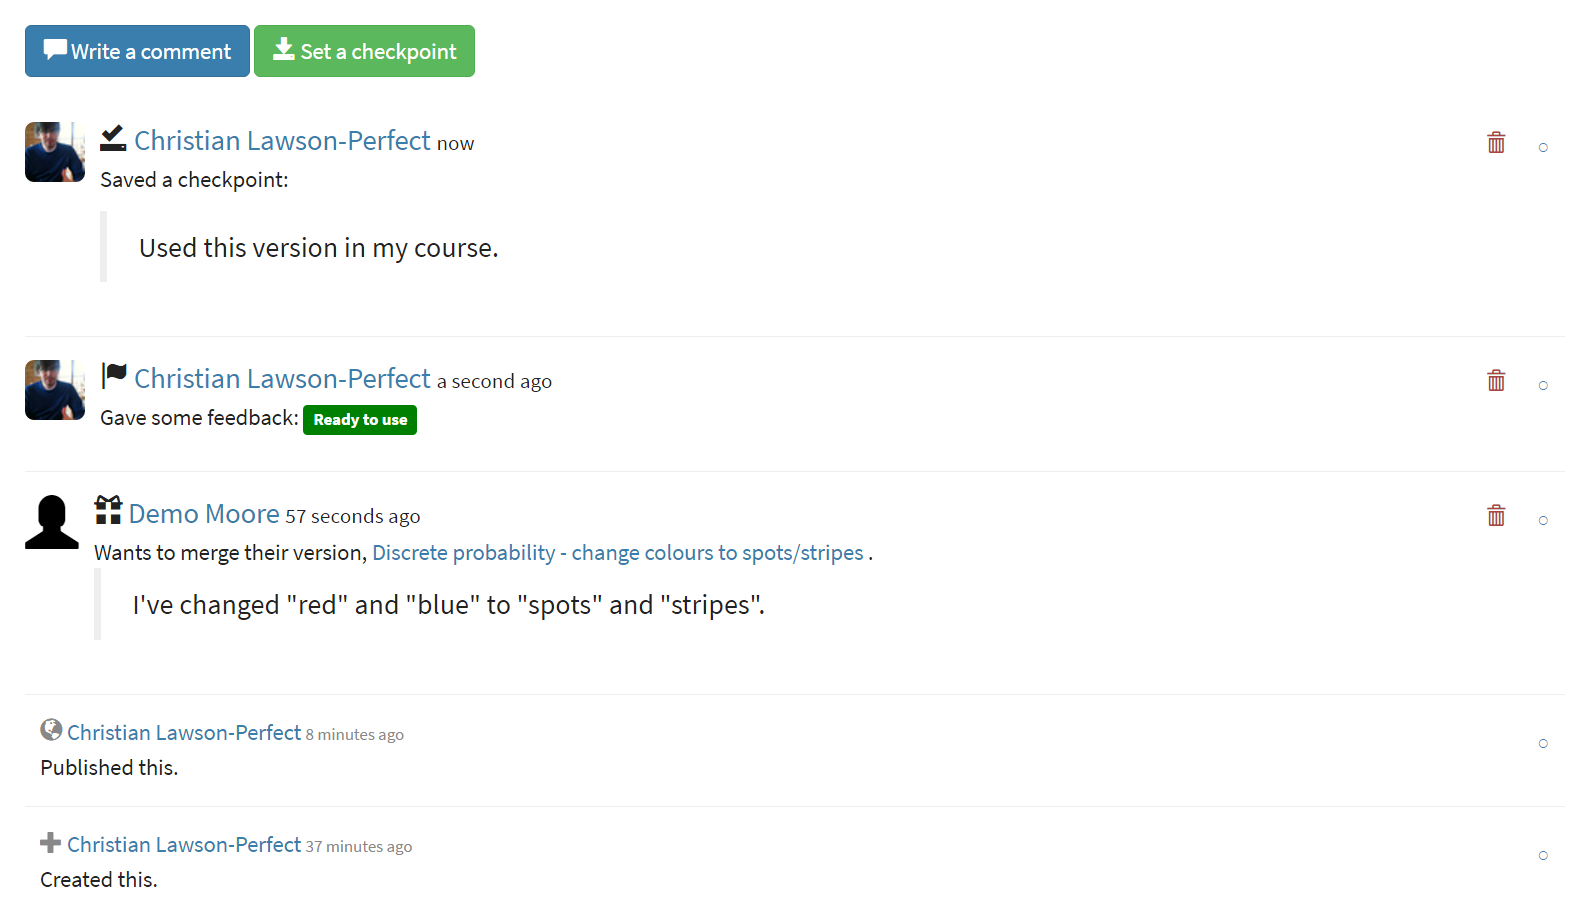
Use this tab to keep a record of changes made to your question. Write comments to discuss problems or suggested changes.
The Contributors list shows everyone who has made a change to this question. This list is included with the question when you download it, and if you re-upload this question to an instance of the Numbas editor.
Each time you make a change to an question, it’s saved to the database. To save a snapshot of the current state of the question, click the Set a checkpoint button. You’ll be asked to write a description of the question as it stands - describe what you’ve changed since the last snapshot, and why you’re making a snapshot.
To restore a checkpoint, click its Restore button. The current state of the question will be overwritten with the saved state.
Other activity on this question will also be shown in this tab: for example, each time somebody uses the Feedback button to provide feedback on this question, an entry is added to the editing history.