Writing an extension#
Creating a new extension#
To begin writing an extension from scratch, click on the Profile link, then Extensions.
Click the Create a new extension button. On the following page, enter a name for your extension and click Submit. Note that the extension’s name must be unique among all extensions in the database, so you might need to change your chosen name if someone else has already used it.
You will then be presented with the editor for the extension’s main script file.
Uploading an extension#
The Upload an extension link takes you to a form where you can upload your extension.
Either upload a single JavaScript file, or a .zip file containing all of the extension’s files.
After uploading your extension, you will be presented with the editor for the extension’s main script file.
- Name:#
A human-readable name for the extension. This should concisely describe what it does, or what feature it provides.
- Short name:#
A unique identifier for the extension.
Warning
An extension’s short name must be unique, and match the short name used when uploading it to the editor. This means that if you reuse an extension and use a different name when uploading it to the editor, you must rename its JavaScript file and change the name given to
Numbas.addExtension.- Documentation URL:#
The URL of a page describing how to use the extension. If this isn’t used, then any
READMEfile in the extension package will be used.
Editing an extension#
To edit an existing extension, click the corresponding link in the list of extensions either in the question editor or in your profile’s Extensions page.
The editor allows you to edit text files in the extension package. After making changes, click the Save button. If you’ve got a question which uses the extension open in another tab, you’ll have to reload it before changes take effect.
Access to extensions#
An extension you create is initially only available to you. You can grant access to other named users under the Access tab in the extension editor.
You can give other users the ability to view your extension, which will allow them to use the extension in their own questions, or the ability to edit, which will also allow them to edit the extension’s source code.
Contents of an extension#
The minimum an extension must contain is a file named <extension-name>.js, containing the following:
Numbas.addExtension('<extension-name>',['base'],function(extension) {

});
(See the API documentation for Numbas.addExtension for details on how this function works)
This function call tells Numbas that the extension has loaded.
Because Numbas can’t guarantee the order script files will be loaded in, code which uses the Numbas object must be placed inside the callback function given to Numbas.addExtension.
An extension can also include CSS files, which will be added to the rest of the Numbas CSS when an exam using the extension is compiled.
Any other file types are included in the compiled package as-is, under the path extensions/<extension-name>.
It’s also a good idea to include documentation on how to use your extension in a README file.
Extensions created through the editor automatically have a README.md file, which is written in Markdown format.
Adding JME functions#
An extension can add JME functions (or rulesets, or anything else that goes in a Scope object) by manipulating the extension.scope object.
Here’s an example which adds a single JME function:
Numbas.addExtension('difference',['jme'],function(extension) {
    var funcObj = Numbas.jme.funcObj;
    var TNum = Numbas.jme.types.TNum;

    extension.scope.addFunction(new funcObj('difference',[TNum,TNum],TNum,function(a,b){ return Math.abs(a-b); }, {unwrapValues:true, random: false}));
})
The random attribute specifies whether the function behaves randomly or not.
The editor uses this to show variable definitions that introduce randomisation, and the runtime uses it to determine which variables can be deterministically re-calculated from their definitions.
(Download this extension: difference.zip)
Adding JME function sets#
If the functions provided by your extension can be usefully grouped, you should use Numbas.jme.FunctionSet objects to do that, so that question authors can select them in the Allowed functions setting of Mathematical expression parts.
You might like to put functions that a student could use in one function set, and functions that should only be used by question authors in another set.
Here’s an example which does that:
Numbas.addExtension('collatz',['jme'],function(extension) {
  var funcObj = Numbas.jme.funcObj;
  var TNum = Numbas.jme.types.TNum;

  const collatz_set = new Numbas.jme.FunctionSet({name: 'Collatz operation', description: 'Functions which perform the Collatz operation'});
  extension.scope.addFunctionSet(collatz_set);
  collatz_set.add_function('collatz', [TNum], TNum, x => x%2 == 0 ? x/2 : 3*x+1);

  const helper_set = new Numbas.jme.FunctionSet({name: 'Collatz helpers', description: 'Helper functions for generating questions about the Collatz sequence'});
  extension.scope.addFunctionSet(helper_set);
  helper_set.add_function('collatz_num_steps', [TNum], TNum, function(x) {
    let n = 0;
    while(x > 1) {
      x = x%2 == 0 ? x/2 : 3*x+1;
      n += 1;
    }
    return n;
  });
})
Adding a new JME data type#
JME data types are JavaScript objects, distinguished by their type property.
The object should have a value property which contains the data it represents.
The JME system can happily use new data types, but you’ll need to tell it how to render them as LaTeX or JME code.
This is done by adding methods to Numbas.jme.display.typeToTeX and Numbas.jme.display.typeToJME.
Once you’ve defined how to create and display the new data type, you can add functions dealing with it in the same way as for the built-in data types.
Here’s an example extension which defines a toy “chemical” data type (excuse the bad chemistry):
Numbas.addExtension('chemicals',['jme','jme-display'],function(chemicals) {

    var chemicalsScope = chemicals.scope;

    // Define the constructor for a new data type representing a chemical formula
    // `formula` is a dictionary mapping element symbols to the number of atoms present
    function TChemical(formula) {
        this.value = formula;
    }
    TChemical.prototype.type = 'chemical';

    // define a couple of example formulas
    chemicalsScope.variables.oxygen = new TChemical({O:2});
    chemicalsScope.variables.water = new TChemical({H:2, O:1});

    // Code to render a chemical formula as LaTeX
    Numbas.jme.display.typeToTeX.chemical = function(thing,tok,texArgs,settings) {
        var out = '';
        for(var element in tok.value){
            out += element;
            var num = tok.value[element];
            if(num>1) {
                out += '_{'+num+'}';
            }
        }
        return '\\mathrm{'+out+'}';
    }

    // Code to render a chemical formula as a JME expression
    Numbas.jme.display.typeToJME.chemical = function(tree,tok,bits,settings) {
        var out = '';
        for(var element in tok.value) {
            if(out.length) {
                out += '+';
            }
            out += 'molecule("'+element+'",'+tok.value[element]+')'
        }
        return out;
    }

    var funcObj = Numbas.jme.funcObj;
    var TString = Numbas.jme.types.TString;
    var TNum = Numbas.jme.types.TNum;

    // define addition on chemicals: add up the elements in each formula
    chemicalsScope.addFunction(new funcObj('+',[TChemical,TChemical],TChemical,function(c1,c2) {
        var nformula = {};
        var element;
        for(element in c1) {
            nformula[element] = c1[element];
        }
        for(element in c2) {
            if(element in nformula) {
                nformula[element] += c2[element];
            } else {
                nformula[element] = c2[element];
            }
        }
        return nformula;
    }));

    // define a function to create a molecule with given number of atoms of given element
    chemicalsScope.addFunction(new funcObj('molecule',[TString,TNum],TChemical,function(element,numatoms) {
        var formula = {};
        formula[element] = numatoms;
        return formula;
    }));

    // define a JME functions which tells you how many of the given element are in a formula
    chemicalsScope.addFunction(new funcObj('numatoms',[TChemical,Numbas.jme.types.TString],Numbas.jme.types.TNum,function(chemical,element) {
        if(element in chemical) {
            return chemical[element];
        } else {
            return 0;
        }
    }));
});
(Download this extension: chemicals.zip)
Adding a new JME notation#
You can define a new JME notation to change how JME expressions are parsed and rendered.
Make a class extending Numbas.jme.Notation.
It should have two properties: Parser, a class which parses strings into abstract JME trees; and JMEifier, a class which renders abstract JME trees as strings.
It should also have a name property containing a human-readable name for the notation, to be displayed in the editor.
If your notation uses curly braces for something other than variable substitution, you can set different delimiters with the property subvars_delimiters = [left_delimiter, right_delimiter].
Add an instance of your Notation class to the dictionary Numbas.jme.notations.
Each Notation object provides methods compile(string) and treeToJME(tree), which use the Parser and JMEifier.
Here’s an example which changes literal numbers to use hexadecimal notation:
Numbas.addExtension('hexadecimal-notation',['jme'],function(extension) {
  var scope = extension.scope;

  class HexadecimalNotation extends Numbas.jme.Notation {
    name = 'Hexadecimal number literals';

    Parser = class extends Numbas.jme.Parser {
      // change the regular expressions for number and integer tokens to match the hexadecimal format.
      re = Object.assign({}, Numbas.jme.standardParser.re, {
        re_integer: /^[0-9a-fA-F]+(?!\.|[0-9a-fA-F])/,
        re_number: /^[0-9a-fA-F]+(?:\.[0-9a-fA-F]+)?/,
      });

      // Number literal strings are passed through this function to normalise them.
      // We override it to instead parse the string as a hexadecimal number, then convert to a decimal string.
      normaliseNumber(str) {
        const m = str.match(/^([0-9a-fA-F]+)(?:\.([0-9a-fA-F]+))?/);
        const int = m[1];
        const fract = m[2] || '0';
        return parseInt(int, 16) + parseInt(fract, 16) / (16**fract.length)
        return parseInt(str,16).toString();
      }
    }

    JMEifier = class extends Numbas.jme.display.JMEifier {
      typeToJME = Object.assign({}, Numbas.jme.display.JMEifier.prototype.typeToJME, {
        number(tree,tok) {
          return tok.value.toString(16);
        }
      });
    }
  }

  Numbas.jme.notations['hexadecimal'] = new HexadecimalNotation();

  // Example
  const jme_tree = Numbas.jme.notations.hexadecimal.compile('2A = 7 * 6'); // returns a tree object representing the parsed expression.
  const jme_string = Numbas.jme.notations.treeToJME(jme_tree); // returns "2A = 7 * 6";

});
Adding a new answer input method#
You can define a new answer input method to be used by custom part types.
An input method is the widget that the student interacts with to enter their answer. For many part types this is a text box; for the multiple response part types it’s checkboxes or radio boxes.
When none of the built-in input methods is suitable, you can define a new one in an extension.
To register an input method, in your extension’s code call the function Numbas.answer_widgets.register_custom_widget with an object containing the following properties:
nameA unique name for the widget. Custom part types using the widget will refer to it by this name, so if you change it then any part types using it will need to be updated.
niceNameA readable name to show in the editor.
widgetA function to construct the widget (described below).
signatureThe type of JME value produced by the widget.
answer_to_jmeA function which takes a value produced by the widget, and returns a JME token.
options_definitionA list of options for the widget, which can be set by a custom part type.
scorm_storageFunctions to save and load answers entered into this widget.
The function to construct the widget takes the following arguments:
elementThe HTML element that the widget should be attached to.
partThe question part object that the widget belongs to.
titleA string to use as the
titleattribute for the widget, if possible. This title is read out by assistive technology to describe the purpose of the widget, so it’s important to use it.eventsA dictionary of callback functions to call in response to events on the widget. The default theme uses the
blurandfocusevents to control whether warning messages are displayed.answer_changedA function to call when the answer entered into the widget changes. It should be called with an object containing properties
validandvalue:validis a boolean representing whether the value can be marked, andvalueis the answer itself.optionsA dictionary of options for the widget, corresponding to the options defined when the widget was registered.
Defining options#
A widget can have as many options as you like.
One option is always defined: hint, a string giving a hint to the student on how to enter the answer.
The options_definition list contains objects with the following properties:
nameA name for the option, which will be used in the
optionsparameter sent to the widget code.labelA readable name for the option, to show in the editor.
input_typeThe type of the option. This determines how the option is displayed in the editor, and the type of value it produces.
default_valueThe default value for the option.
hintSome text to help part type authors, describing how the option is used and kind of values it should take. This is optional - if the label gives enough information, you can omit the hint.
dataSome input types need extra information, contained in this object.
The following types of option are available:
stringA short text string.
percentA number between 0 and 100.
mathematical_expressionSome JME code.
checkboxA
booleanvalue, set in the editor by a checkbox.dropdownChoose one from a list of string options. The
dataobject must contain a propertychoices, a list of objects of the form{value, label}.codeA long text string. In the editor, this is presented in a code editor.
htmlA string of HTML. In the editor, this is presented in a rich-text editor.
choose_severalA list of options, each of which can be selected or not. The
dataobject must contain a propertychoices, a list of objects of the form{value, label}. This type of option produces a list of the selectedvaluestrings.list_of_stringsA list of short text strings.
choice_makerA list of short text strings, presented in the editor as an editable list of choices.
number_notation_stylesA list of number notation styles. In the editor, this is displayed as a list of checkboxes associated with each number notation style.
Example#
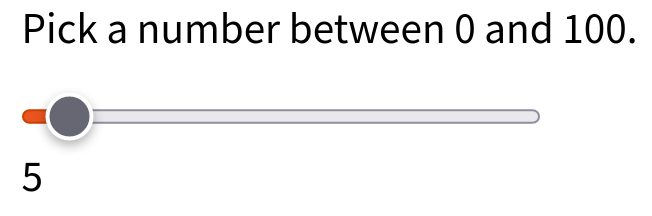
A part using the input method defined in this example.#
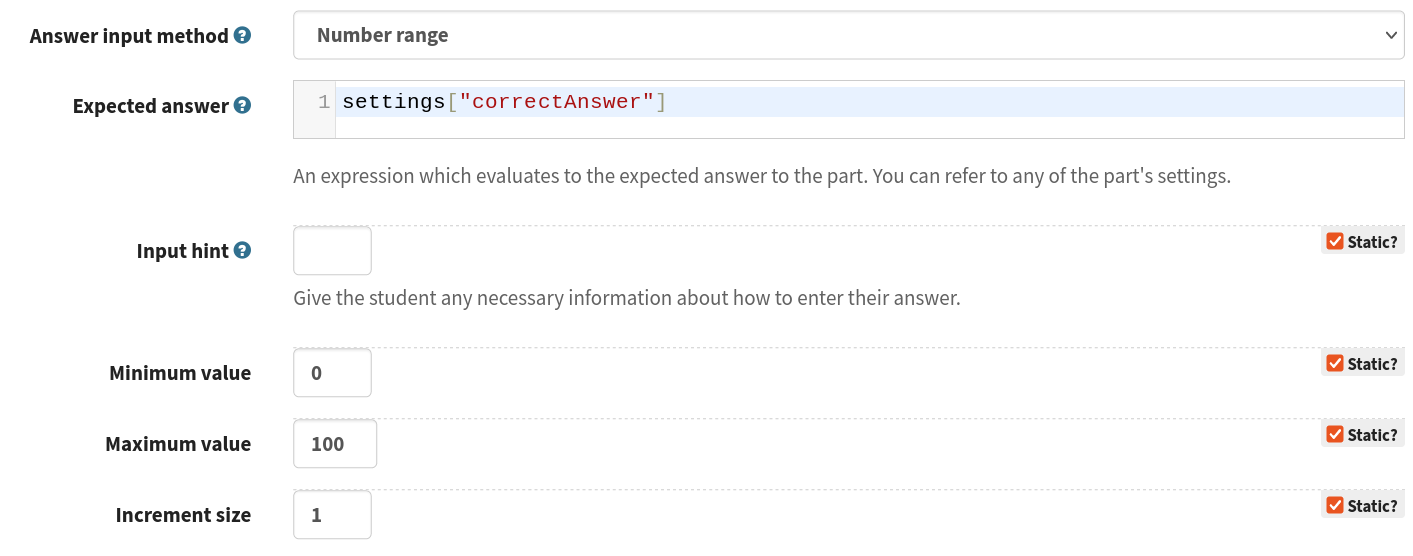
Configuring the input method in the custom part type editor.#
Here’s an example which defines an input method where the student has to pick a number from a range:
function RangeWidget(element, part, title, events, answer_changed, options) {
    var w = this;
    this.part = part;
    var container = document.createElement('div');
    element.appendChild(container);
    var input = this.input = document.createElement('input');
    container.appendChild(input);
    var display = this.display = document.createElement('span');
    container.appendChild(display);
    this.answer_changed = answer_changed;
    input.setAttribute('type','range');
    input.setAttribute('title',title);
    input.setAttribute('min',options.min);
    input.setAttribute('max',options.max);
    input.setAttribute('step',options.step);
    for(var x in events) {
        input.addEventListener(x,events[x]);
    }
    input.addEventListener('input',function(e) {
        w.update_display();
        answer_changed({valid: true, value: input.value});
    });
    this.update_display();
}
RangeWidget.prototype = {
    setAnswerJSON: function(answerJSON) {
        this.input.value = answerJSON.value;
        this.update_display();
    },
    disable: function() {
        this.input.setAttribute('disabled',true);
    },
    enable: function() {
        this.input.removeAttribute('disabled');
    },
    update_display: function() {
        this.display.textContent = this.input.value;
    }
}

Numbas.answer_widgets.register_custom_widget({
    name: 'range',
    niceName: 'Number range',
    widget: RangeWidget,
    signature: 'number',
    answer_to_jme: function(answer) {
        return new Numbas.jme.types.TNum(answer);
    },
    options_definition: [
        {
            name: 'min',
            label: 'Minimum value',
            input_type: 'string',
            default_value: '0'
        },
        {
            name: 'max',
            label: 'Maximum value',
            input_type: 'string',
            default_value: '100'
        },
        {
            name: 'step',
            label: 'Increment size',
            input_type: 'string',
            default_value: '1'
        }
    ],
    scorm_storage: {
        interaction_type: function(part) { return 'fill-in'; },
        correct_answer: function(part) { return part.input_options().correctAnswer; },
        student_answer: function(part) { return part.studentAnswer; },
        load: function(part, data) { return data.answer; }
    }
});
Adding a new variable template type#
You can define a new entry in the question editor’s list of variable data type templates to help question authors define question variables using a data type provided by your extension.
A variable template consists of an editor widget that the question author interacts with, and code to convert the value of that widget to a JME expression, and vice versa.
To register a variable template type, in your extension’s code first check that Numbas.editor is defined, and then call the function Numbas.editor.register_variable_template_type with a constructor function.
The constructor function should take a single argument value and return an object containing the following properties:
idA unique identifier for the template.
nameA readable name to show in the editor.
valueThe
valueargument.load_definition(definition)A function which takes a JME expression and calls this.value() with a representation of the value to show in the editor widget.
jme_definitionA function which produces a JME expression corresponding to the value of the editor widget. You can get the current value of the widget by calling this.value().
widgetA constructor for an HTML custom element containing the editor widget for the user to interact with.
The element must have a method
set_value(value)which is called when the displayed value should change.When the value of the widget changes, it should dispatch a
changeevent whosedetailproperty contains an attributevaluerepresenting the value of the widget.
Example#
Here’s an example which defines a variable template for a boolean value, where the author can use a checkbox to change the defined value:
if(Numbas.editor?.register_variable_template_type !== undefined) {
    class TickboxWidget extends HTMLElement {
        static get observedAttributes() { return ['value']; }

        constructor() {
            super();
            this.attachShadow({mode:'open'});

            const template = `
                                    <label>Active? <input type="checkbox" id="active-checkbox"></label>
            `;
            this.shadowRoot.innerHTML = template;

            const input = this.shadowRoot.querySelector('#active-checkbox');

            input.addEventListener('change', e => {
                    const value = input.checked;
                this.set_value(value);

                this.dispatchEvent(new CustomEvent('change', {detail: {value: value}}));
            });
        }

        set_value(checked) {
            const input = this.shadowRoot.querySelector('#active-checkbox');
            input.checked = checked;
        }
    }
    window.customElements.define('variable-template-tickbox', TickboxWidget);

    Numbas.editor.register_variable_template_type(function(value) {
        return {
            id: 'tickbox',
            name: 'Tick box',
            value: value,
            load_definition(definition) {
                var tree = Numbas.jme.compile(definition);
                if(!tree.args || tree.tok.type == 'nothing') {
                    this.value(false);
                } else {
                    var checked = Numbas.jme.builtinScope.evaluate(tree).value;
                    this.value(checked);
                }
            },
            jme_definition() {
                const checked = this.value();
                return checked ? 'true' : 'false';
            },
            widget: TickboxWidget
        }
    });

}